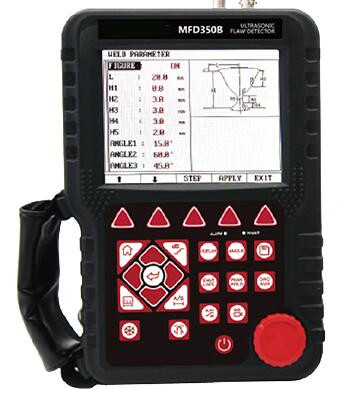

MFD350B digital ultrasonic flaw detector with 320*240 TFT LCD, it can test, orient, evaluate and diagnose various flaws such as crack, lard, air hole in workpiece’s interior swiftly and accurately without any destruction. It can be used in Laboratory as well as in engineering filed. With range of 0-6000mm, it can meet the requirement for general defect inspection in manufacturing industry, metallurgical industry, metal processing industry, chemical industry and so on. Low power design with large capacity and high performance lithium battery module, it can be long standby for months. High quality with low price, it is the first choice for the practical economic model for ultrasonic testing equipment.
The instrument can be widely used in locating and sizing hidden cracks, voids, disbands and similar discontinuities in welds, forgings, billets, axles, shafts, tanks, pressure vessels, turbines and structural components.
Features:
Gate Alarm
Gate position, gate width and gate height can be adjustable at will. The B gate can chose to set wave-getting alarm or wave-losing alarm. The beep in gate and LED light can be alarmed or closed (the LED light alarm is very effective under the noise environment).
Data Storage
The instrument is built with mass storage, the data and files will not be lost because of instrument power breakdown. The storage contents included channel parameters, waveform pictures and video files. It supports 100 groups of flaw detecting parameters channels. It can preset well for the combination parameters of various types of probes and instruments as well as set testing standards for each industry freely. It can save 1000 pictures of detecting echo signals and parameters. It can realize to save, read and transfer the data via the USB port.
Video Function
The instrument supports for saving the inspection process as video file and save it to the internal storage card. Video file can be replayed through the instrument. The instrument can support 2 minutes video.
REAL-TIME CLOCK
Record and save the tracking record of detecting date and time in real time.
Communication
With USB2.0 high speed communication interface, it also can use special software to upload and download data through the USB port.
Battery Module
The large capacity lithium battery module is easy to be assembled and disassembled. It can be charged independently but also charged by inserting wire. Its continuously working time is more than 8 hours.
Display Resolution | (320×240 pixels) multi-color TFT LCD |
Blind Area | 5MM |
Flaw Sizing | Automatic flaw sizing using AVG/AVG or DAC, speeds reporting of defect acceptance or rejection. |
Weld Figure Feature | Weld Figure feature can be enabled when detecting the weld parts using angle transducer. |
Auto-Calibration | Automated calibration of transducer zero offset and/or material velocity |
Memory | be able to store, recall the A-Scan patterns and instrument settings |
Flaw Locating | Live display Sound-path, Projection (surface distance), Depth, Amplitude |
Defect Quantification | directly display the result with db unit |
Defect characterization | calculate the equivalent size of the flaw easily and quickly to facilitate the judgment of artificia |
Curved Surface Correction | used to measure the surface distance and depth of defect on a curved surface |
DAC/AVG | Y |
AWS D1.1 | one of the AWS(American Welding Society) standa |
Crack Height Measuring | measure and display the height of a crack found inside the workpiece |
Magnify Gate | spreading of the gate range over the entire screen width |
Video Recording | more than 10 minutes |
A Scan Freeze | Display freeze holds waveform and sound path data |
Coded Echo Color | locate the flaw position |
B-Scan | display a graphical cross-section of the workpiece |
Power-Saving Method | low power consumption |
Protection Level | IP54 |
Communication Interface | High Speed USB2.0 port |
DataPro Software | Y |
Working Language | freely switch between Chinese and English |
Total Weight | 6.0KG |
Measuring Range | (0 ~ 6000) mm at steel velocity |
Bandwidth | 0.5 to 10MHz automatic matching according to the probe frequency |
Material Velocity | (1000~ 9999) m / s |
Dynamic Range | ≥ 36dB |
Vertical Linear Deviation | ≤ 3.0% |
Horizontal Linear Deviation | ≤ 0.2% |
Resolution | > 40dB (5P14) |
Sensitivity Leavings | >60dB (flat-bottomed deep hole 200mmФ2) |
Rejection | (0 to 80)% Linear without affecting the linearity and gain |
Noise Level | ≤ 10% |
Probe Type | straight beam probe, angle beam probe, dual element probe, through-transmit probe |
Gates | Wave-getting Gate, Wave-losing Gate, Single Gate Reading, Dual Gate |
Alarm | Beep Alarm and LED light Alarm |
Power Supply | DC 9V |
Working Time | >8 hours |
Overall Dimensions | 263 × 170 × 61(mm) |
Operating Temperature | (-10 ~ 50) ℃ |
Relative Humidity | (20 ~ 95)% RH |
Pulse Energy | Low, Medium and High spike pulse selectable, suitable for various probe |
Pulse Width | (0~99.99)µs range with continuous adjustment to match the different probes |
Probe Damping | 100Ω、200Ω、400Ω selectable to meet different requirements |
Sampling | 10 digits AD Converter at the sampling speed of 160MHz |
Rectification | Positive half wave, negative half wave, full wave, RF |
Gate Reading | optional for single and double gate mode, both peak and edge |
Gain | 0 dB to 110 dB adjustable in selectable steps 0.1 dB, 1 dB, 2dB and 6dB |
Transducer Connections | BNC or LEMO |